Interactive Gameplay
Currently, this project focuses on fishkeeping (I may add turtles later, or perhaps consider kittens depending on circumstances).
Fishkeeping requires regular feeding, continuous aeration, and—during winter—heating or maintaining a constant temperature environment for certain species, as well as providing adequate lighting and periodically cleaning up waste, such as fish droppings.
Power Control
I plan to use a power switch to control the operation of the air pump, specifically its on/off status and duration.
Option 1:
Use the Xiaomi Smart Socket 3. However, this device is restricted to use within the Xiaomi Home app; while it can be added to Home Assistant, it only allows for status monitoring—it does not provide control over the power switch itself.
Option 2:
Use ESPHome + a relay module + a power bank.
I intend to utilize MQTT for communication, allowing the system to receive control signals (such as on/off commands) and other parameters (such as timing settings).
MQTT Implementation
ChatGPT and Gork recommended an open-source MQTT project specifically suited for ESP32 boards running MicroPython.
GitHub Repository: https://github.com/peterhinch/micropython-mqtt
I had used this library previously. However, after a hiatus of several months—during which I made absolutely no changes to my code—it suddenly began throwing persistent errors. I then attempted to switch to ESPHome’s MQTT implementation (only to be met with a screen full of errors during installation).
Finally, I reinstalled the micropython-mqtt library and rewrote the code from scratch. With assistance from ChatGPT and Gork, I continued to encounter errors; however, when I reverted to using my original code, it worked perfectly.
In short, I spent several hours troubleshooting this issue.
The combination of the old MQTT library and the old code was problematic.
The combination of the new MQTT library and the new code was also problematic.
However, the combination of the new MQTT library and the old invocation code worked without issues.
Hardware-related issues can sometimes be truly baffling—much like how software glitches often seem to resolve themselves simply by restarting the computer.
Final Result
The system is now operational: whenever a viewer in the YouTube Live chat sends the command “air,” the air pump activates. [Regarding] This Specific Word
My air pump automatically activates and runs for 5 seconds, then automatically shuts off.
I am using the software mentioned in my previous post—Streamer.bot-x64-1.0.4. It executes a Node.js script to send an MQTT message to an ESP32 microcontroller, which then triggers a relay to supply power.
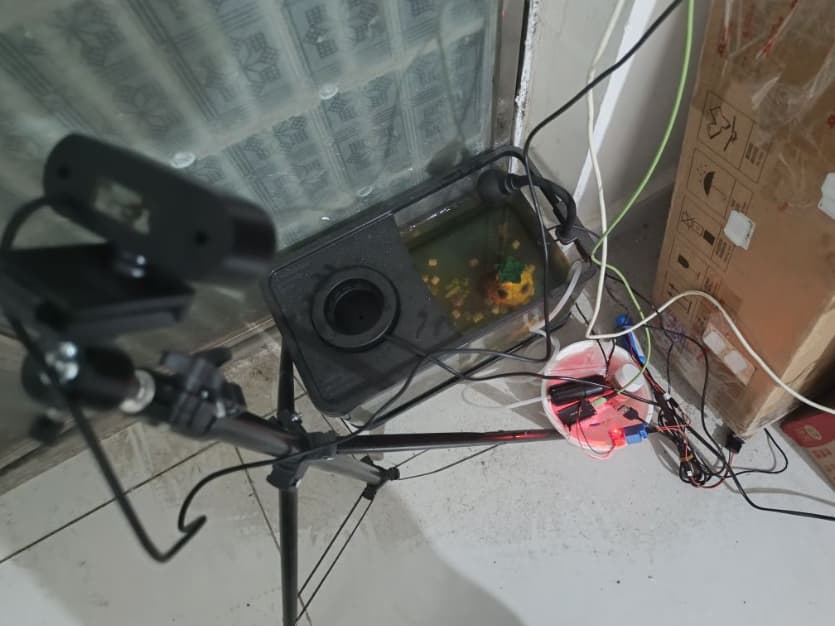
The image below shows my setup: a Windows PC paired with a USB webcam, streaming live via OBS.
Inside the white bowl sit the ESP32 and the relay; once powered up, the system pumps air to oxygenate the fish tank.
I streamed for 9 hours today, but only had 10 concurrent viewers. I anticipate that traffic will pick up once I introduce more interactive features and gameplay elements in the future.
The Actual Code
To ensure I don’t forget it later, I’m posting the latest version of the code here.
First, create a new file and set up the necessary MQTT library.
It was only after consulting ChatGPT and Gemini that I learned MicroPython allows you to install required libraries using mip.
Previously, I used to transfer files manually—one by one—to the ESP32 via the serial port using Python scripts (which was incredibly tedious!).
import network
wlan = network.WLAN(network.STA_IF)
wlan.active(True)
wlan.connect('ssid', 'passwd')

# wait
import time
while not wlan.isconnected():
    time.sleep(1)
    print('waiting WiFi...')

print('WiFi connect:', wlan.ifconfig())

# try
import mip
mip.install("github:peterhinch/micropython-mqtt")
After installing micropython-mqtt,
add the configuration file mqttconfig.py.
# mqtt_local.py
WIFI_SSID = 'ssid'
WIFI_PW = 'passwd'

MQTT_SERVER = 'emqx.xxx.com'
MQTT_PORT = '21883'
MQTT_SSL = False
MQTT_USER = 'user'
MQTT_PASSWORD = "passwd"
MQTT_TOPIC = "powerSwitch"
Finally, here is the actual code for the implementation, incorporating the use of relays and MQTT: main.py
import uasyncio as asyncio
from machine import Pin, ADC
from mqtt_as import MQTTClient, config
import json
from mqttconfig import WIFI_SSID, WIFI_PW, MQTT_SERVER, MQTT_PORT, MQTT_SSL,MQTT_USER,MQTT_PASSWORD,MQTT_TOPIC

pin9 = Pin(22, Pin.OUT)
pin9.value(0)
pin9.off()


# ---------------------------
# MQTT Callbacks
# ---------------------------
def on_message(topic, msg, retained):
    print("Message received:")
    topic_str = topic.decode()
    msg_str = msg.decode()
    print("topic:", topic_str)
    print("message:", msg_str)
    if topic_str == "powerSwitch":
        try:
            parsed = json.loads(msg_str)
            switchStatus = parsed.get("switchStatus")
            sleepNum = int(parsed.get("sleepNum", 1))
            asyncio.create_task(handle_relay(switchStatus, sleepNum))

        except Exception as e:
            print("Failed to parse JSON:", e)
    else:
        pass

async def handle_relay(switchStatus, sleepNum):
    if switchStatus == "openAndClose":
        print("start",sleepNum)
        pin9.value(1)
        await asyncio.sleep(sleepNum)
        pin9.value(0)
        print("end",sleepNum)
    elif switchStatus == "open":
        print("start")
        pin9.value(1)
    elif switchStatus == "close":
        print("end")
        pin9.value(0)
async def on_connect(client):
    print("MQTT connected")
    await client.subscribe("powerSwitch", qos=1)
    print("Subscribed to powerSwitch")

# ---------------------------
# Setup MQTT
# ---------------------------
config["ssid"] = WIFI_SSID
config["wifi_pw"] = WIFI_PW
config["server"] = MQTT_SERVER
config["port"] = MQTT_PORT
config["ssl"] = MQTT_SSL
config['user'] = MQTT_USER
config['password'] = MQTT_PASSWORD
config['client_id'] = 'esp32_air001'

config["subs_cb"] = on_message
config["connect_coro"] = on_connect

client = MQTTClient(config)

# ---------------------------
# Main Entry
# ---------------------------
async def main():
    await client.connect()
    while True:
        await asyncio.sleep(1)

try:
    asyncio.run(main())
finally:
    client.close()
If you don’t understand it, you can feed the code to an AI and let it analyze it.